VirtioFS
Virtiofs is a shared file system that lets virtual machines access a directory tree on the host. It is available since Ravada v1.6.
Usage Examples
Shared Space
Directories and files can be shared from the host to the virtual machines. All kinds of files and data can be stored for read and write access. Read-only mode can be optionally enforced at mount time.
Private Space
It can be configured a private space for each virtual machine. Unprivileged users will only be able to write and read their own files. It can be granted special access to all the data if it is required. A case usage could be to store students assignments and the teacher is granted access to all the files.
Requirements
VirtioFS works only with libvirt 6.2. It is installed in these Linux Distributions:
Ubuntu 22.04
Debian 11
Alpine 3.16
( TODO : Please contribute if you are aware of more , thank you ! )
Virtual Machine Configuration
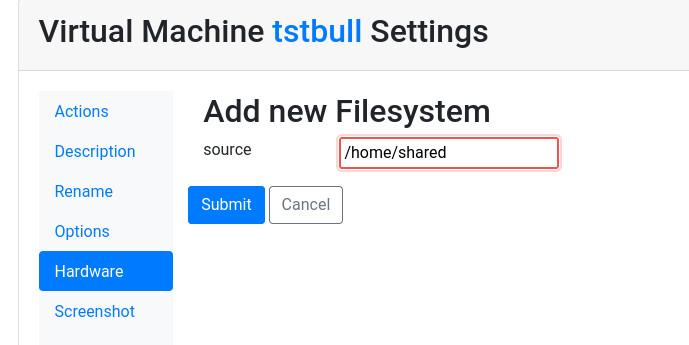
In the hardware section of the virtual machine, add a new filesystem item. You have to pass the full path you want to share with the virtual machine.
Linux
Using virtiofs from Linux virtual machines is pretty straightforward and the drivers come already with any latest kernel.
Mount in the Virtual Machine
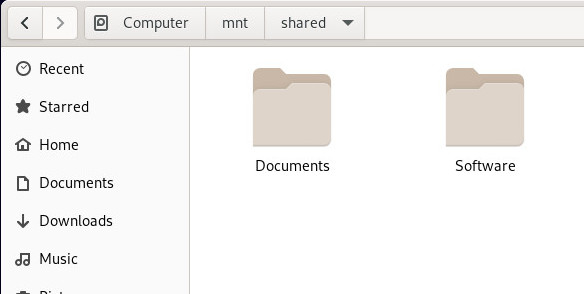
To mount the partition add a line in the fstab with the source name and the directory you want to mount it. In this example we mount the directory exported from /home/shared, that will be called home_shared. It will be mounted in the path /mnt/shared inside the virtual machine.
home_shared /mnt/shared virtiofs rw,relatime 0 0
Create the mount path /mnt/shared and type mount -a to try it.
Mount read-only
In the first example we accessed the directory with read and write options. If you want to access it read only, mount it this way:
home_software /mnt/software virtiofs ro,relatime 0 0
Mount in Windows
Changing the owner of the directory
In the previous section we created a directory for all the virtual machines to see. It is usually ok if you just want to share files read only or that only root can write to. It is possible to allow the user of the desktop to write in this shared location right away.
Set the user id
Setting the user id is very important because the user will not be able to write unless it is carefully chosen. To do so start the virtual machine and check what is the user id for the user. It is usually created at installation time. If you are not sure what is the name of the user, just boot the base, enter the desktop and that command.
id `whoami`
The very first numerical value returned is the one you must configure for the shared filesystem.
The owner of the shared filesystem must be set first in the host. Access the server where all the virtual machines are stored and change the owner with the uid you just found out in the previous step.
sudo chown 1000 /home/shared
Mount Subdirectory in the base
First you have to create the mount point in the virtual machine. The owner of that subdirectory must be the user that runs the desktop.
mkdir /mnt/shared
chown 1000 /mnt/shared
Then add it to the fstab file so it gets mounted on boot unless you already did in the previous step.
home_shared /mnt/shared virtiofs rw,relatime 0 0
Reboot and check it is mounted when booting:
df | grep shared
You must see something like this, with the name of the partition first, and the mount point.
home_shared /mnt/shared virtiofs rw,relatime 0 0
Check the user is able to write there:
touch /mnt/shared/test
rm /mnt/shared/test
Subdirectory Mode
The basic usage is having a directory that all the clones can see. It is possible to have each cloned virtual machine to have its own private space.
This works creating a subdirectory for each clone when it is created.
Create Subdirectory filesystem
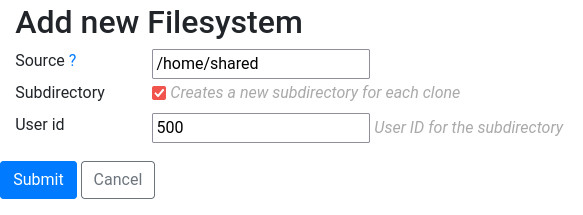
Create a base and add a shared partition, but this time select the checkbox for Subdirectory. Also set the user id that will be the owner of the files.
See the previous step to find out what user id you must define here: “Changing the owner of the directory”
Set the owner
Make sure the user is set as the owner of the directory mountpoint,
Prepare the Base
Once the filesystem is setup and you have checked it boots okay and the user can write there, prepare the base either clicking the checkbox in admin machines or in the virtual machine setup.
How the clones see it
When the user boots the clone, all that is shown is a directory mounted at /mnt/shared with the contents this user writes.
How is it stored in the server
If you inspect the contents of the server partition after some clones have used this, you will see something like this:
# ls /home/share
 drwxr-xr-x 2    1000 root 4096 june  14 11:04 tstbull-username1
 drwxr-xr-x 2    1000 root 4096 june  14 11:04 tstbull-username2
Further inspections of the content of the subdirectory tstbull-username1 will provide the files the the user has created from the virtual machine.