Install Alpine Linux
Alpine is a really small linux distribution. It can be installed in a really tight disk drive with barely no RAM. It is good for testing purposes but it can also be used in production servers.
These are guidelines to install Alpine Linux inside a Ravada KVM Guest.
Base Guest
The guest should have more than 256 MB of RAM. If you are planning to run many services you should create the virtual machine with more memory. You can increase it later if you want to keep it slim.
At least 1GB disk drive is required. A swap partition should also be added when creating the virtual machine.
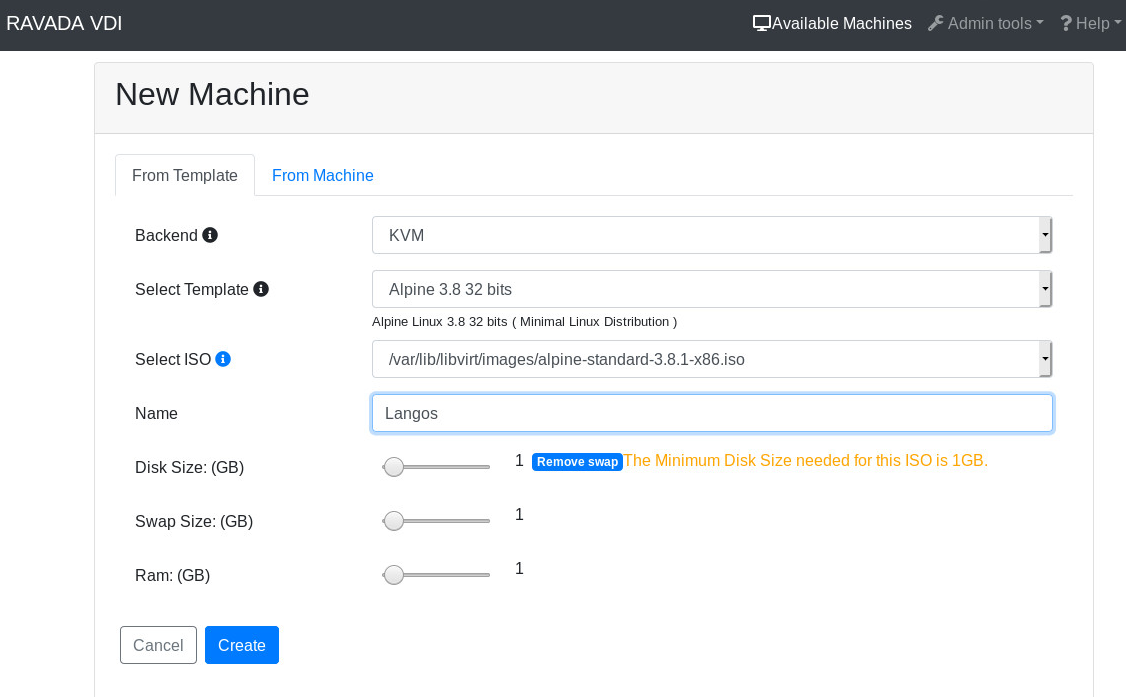
Create Alpine Virtual Machine
When the machine is created start it from Admin Tools menu, click on Virtual Machines to see a list. At the right there is a bunch of buttons. Click on view to start and access the virtual machine console.
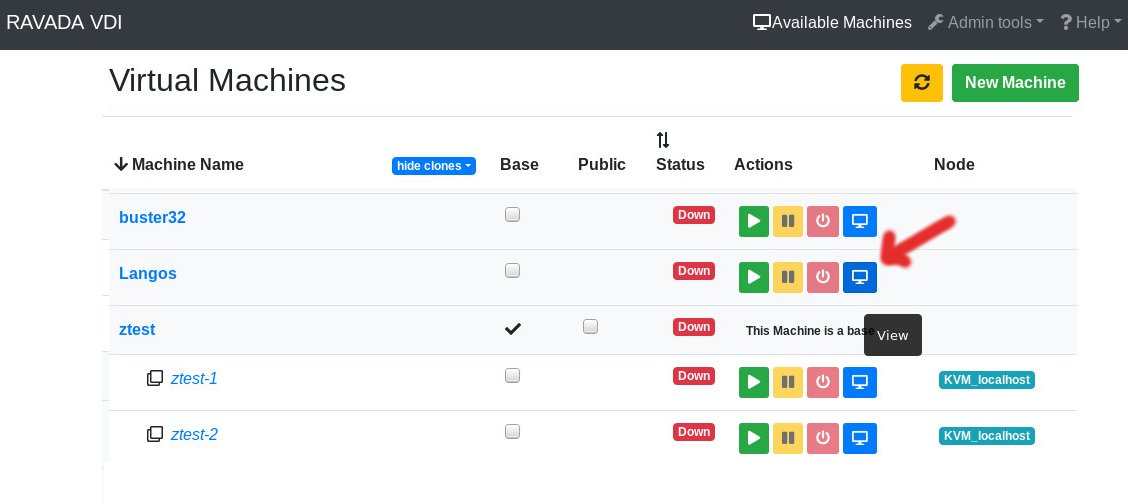
Start and View Virtual Machine
Login
Once it boots login as root with no password.
Setup
Alpine Linux has a setup script that eases the installation process. These are the default settings we use in a Ravada-KVM Virtual Machine.
Start the setup typing:
setup-alpine
If you see an error about missing mirrors you must stop the process pressing CTRL+C , then set manually a mirror like this one:
export MIRRORS=http://mirror.leaseweb.com/alpine/
setup-alpine
Keyboard
First choose a keyboard layout and variant.
Hostname
Type a hostname for the virtual machine. If you call it with the same name when you created the machine before it would be easier for you:
Networking
The setup will detect a network interface, probably eth0. Accept this value. Also you should probably accept using dhcp and answer no to manual network configuration, unless you know what you are doing.
Password
Type a new password for the root user.
Timezone
Select a timezone, the default UTC won’t do any harm when you are testing, but if you know the actual timezone, type it.
Proxy
If you are downloading packages through a proxy tell it now, you probably should keep it to none.
Mirror
Choose a mirror for Alpine to download packages from. Type 1 if you set the mirror manually with an export before. If not type f and it will check your connection and choose the best one, it may take a while.
SSH Server
Answer openssh when asked about an SSH server.
Partitioning
The setup script will ask the disk
Available disks are:
- vda
- vdb
Which disk(s) would you like to use? [none] vda
How would you like to use them ? [?] sys
WARNING: Erase the above disk(s) and continue [y/N]: y
Now the setup process will install minimal applications to start the server.
Reboot
Once it is installed reboot to continue setting this virtual machine.
reboot
Installing more software
You should at least install ACPI, udev and qemu-guest agent.
To do so, community repositories must be enabled. Uncomment the community line from /etc/apk/repositories
#/media/cdrom/apks
http://dl-cdn.alpinelinux.org/alpine/v3.16/main
http://dl-cdn.alpinelinux.org/alpine/v3.16/community
#http://dl-cdn.alpinelinux.org/alpine/edge/main
#http://dl-cdn.alpinelinux.org/alpine/edge/community
#http://dl-cdn.alpinelinux.org/alpine/edge/testing
apk add qemu-guest-agent acpi udev

rc-update add udev
rc-update add udev-trigger
rc-update add udev-settle
rc-update add udev-postmount
rc-update add qemu-guest-agent
Shutdown and restart
Type these commands from the console to restart and shutdown the server:
reboot
poweroff
Advanced Settings
Add a swap partition
If you added a swap volume in the Ravada installation form you must define it later after the Alpine setup script.
Define de partition
The swap device will be probably in /dev/vdb , check first with df it is not mounted already. If it is not shown it is ok.
Using fdisk you should find an empty disk and you must create the partitions like this:
localhost:~# fdisk /dev/vdb
Command (m for help): n
Command action
   e   extended
   p   primary partition (1-4)
p
Partition number (1-4): 1
First cylinder (1-2080, default 1):
Using default value 1
Last cylinder or +size or +sizeM or +sizeK (1-2080, default 2080):
Using default value 2080
Command (m for help): w
The partition table has been altered.
Calling ioctl() to re-read partition table
Create the swap
mkswap /dev/vdb1
Test it
Type this to start using the swap space:
swapon -a
This command will check the memory utilization, at the bottom there should be now a swap entry:
free
             total       used       free     shared    buffers     cached
Mem:       1031924      48896     983028        100       2884      10964
-/+ buffers/cache:      35048     996876
Swap:      1262140          0    1262140
Add it to the system
echo "/dev/vdb1 swap swap defaults 0 0" >> /etc/fstab
Now the swap space is configured, after rebooting the system it should show typing the free command.